İngiliççesi daha mı anlaşılır mı ne ki aceba ? If you work in 12-13 versions, first of all let us slightly change installations on- silence: Tools > Display > Options > place galochku next to Enable node Tracking so that it would be possible to round off the angles of rectangles by hand.
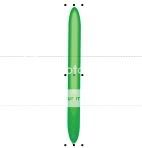
Let us begin from the needles. We sketch the rectangle approximately 1 X of 3 mm. after stretching, for one of the angular markers, we round off angles on the maximum.
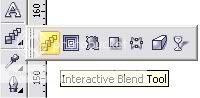
We extend figure on the vertical line, it is somewhere to 10 mm. colored green. In order to give to our needle, the certain similarity of volume, for this it is necessary to draw its brightest part. After pressing Shift, it is decreased needle to to center, with its simultaneous copying. Is moved the received "speck of light" into the upper part of the needle, since it there will be by most illuminated and it is painted with its bright green color. We get rid of the encirclings. We select in the panel of tools Interactive Blend Tool
and after clicking on the "speck of light" we pull downward to the needle, without releasing the left button of mouse.
We tune a quantity of steps. The more them it will be, the more smoothly will be the passages color, but from other side, for this it is necessary to pay with reduction in the speed of computer. Therefore it is necessary to adhere to the golden mean. I selected seven steps, "after coding" the attacker by the seventh yr: -).
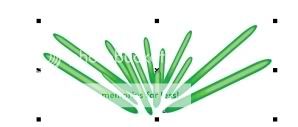
We duplicate our needle, necessary quantity of times. We revolve, we scale, distort duplicates so that would come out approximately this here rosette from the needles.
It is better to make not one and several not too similar to each other rosettes. The more them it will be, and the more diverse they will be, those more natural, in the final analysis, fir twig will appear. I have enoud patience to three variations. We separate Blend- effect from all needles Arrange > Break Blend Group Apart (Ctrl+.K). We group each rosette separately.
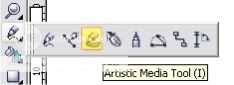
We create by sprey. We search for in the menu of tools Artistic Media Tool.
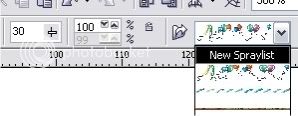
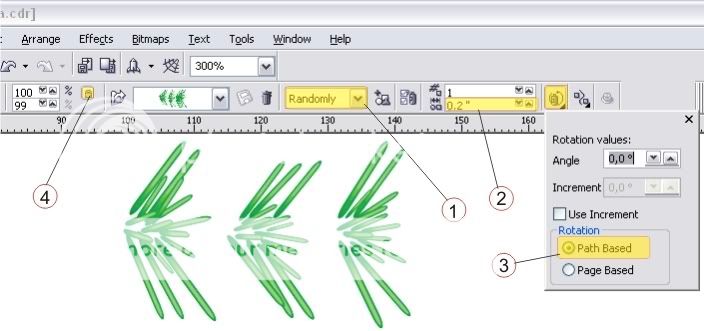
We turn the created rosettes to 270°, if they sketched them also as 4 - it is vertical. On the upper interactive panel we select Sprayer.
In the descending list we select New Spraylist.
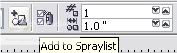
We separate the first rosette, and we harvest on Add To Spraylist,
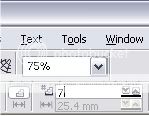
then we click on the second and also we add into the spre1- sheet, then third. We assign the parameters of spreya, as it is indicated on the picture.
Kraten'kaya interpretation of the selected values and parmetrov:
1. it combines the created by us "smear- rosettes" (I it called so, but in spreya, this faster drops) randomly, it has a value, when them it is more than two
2. assigns the distance between the "smears" (it is possible from the fir tree for example, to make a horsetail, after increasing this value.
3. it ties smears to the route of line.
4. this point to greatly prove useful, if to you it is wanted so that the size of smears would change on that drawn or that used as the way of line from greater to smaller, well or vice versa.
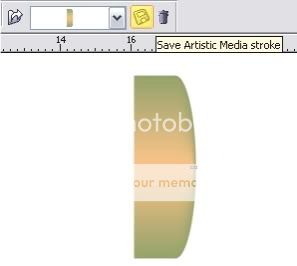
We preserve that made by us by sprey, after harvesting to the button with the image of disketki, next to the falling out list.
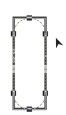
In order to draw the branch, on which, our needles are held, let us make its own brush. Not I will stop at the process of its creation in detail, since principle the same as in the creation of needle. After creating the similar to the figure given below, we pass here
we preserve brush, in addition pressing on "disketku", preserving the result of our tortures.
Well, and that to make with these spreyem and brush, I think, will prompt your fantasy: -) It is possible to supplement branch with the spheres, made on this lesson, by snowflakes from finished korelovskogo spreya.
Note: Needles can be made any other method from meshey to the insert of the cut out needles from real fotki.
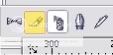
And also, the direction of spreya, released along the way can be changed to the opposite, after selecting line by sheyperom and after harvesting to this knopochku.
Using the case, I want to congratulate all forumchan and guests of forum with the advancing new year!
I lay out kist'i and sprey in 13 and 11 versions (sprey11). In order by them to use, copy the razarkhivirovannye files here: C:\.Documents and Settings\Im4 pol'zovatelya\.Applichation Data\.Corel\.Graphics13\.User Draw.
Successes!
brush.zip (3.47k) the quantity of the running off: 1046 sprey.zip (71.96k) the quantity of the running off: 1041 sprey11.zip (69.55k) the quantity of the running off: 934 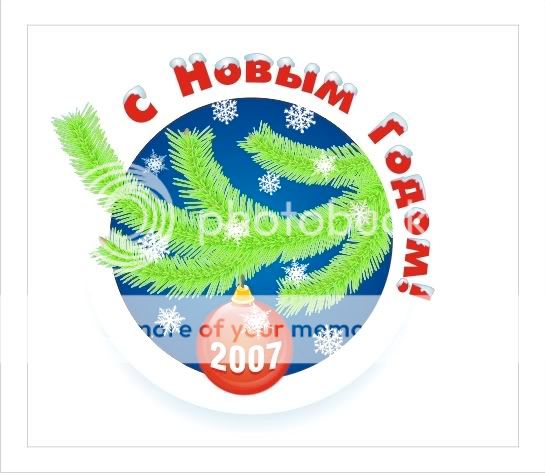
")